Recent Posts
Navigating the Depths: Recovering from Flooded Basements in the Northeast
5/4/2024 (Permalink)
The Northeast, known for its diverse climate, occasionally experiences heavy rainfall and storms that can lead to basement flooding. Recovering from a flooded basement is a daunting task, but with the right approach, Northeast homeowners can restore their homes and prevent future incidents. Here's a comprehensive guide to help you navigate the aftermath of a flooded basement.
Ensure Safety First
Before entering a flooded basement, prioritize safety. Turn off the electricity to prevent electrical hazards, and if the water level is high, wait for it to recede before entering. Always wear protective gear such as rubber boots, gloves, and a mask to minimize exposure to contaminants.
Understanding the source of the flooding is crucial for effective cleanup and prevention. Whether it's heavy rainfall, a burst pipe, or a sewer backup, identifying the cause will guide your recovery efforts.
Remove Water and Debris
Use a submersible pump, a wet/dry vacuum, or buckets to remove standing water. Be thorough in removing waterlogged items and debris to prevent mold growth and further damage.
Take photographs and document the damage for insurance claims. Detailed records of the affected areas and belongings will streamline the claims process and ensure you receive adequate compensation for your losses.
Ventilate and Dehumidify
Open windows and doors to facilitate air circulation and speed up the drying process. Use dehumidifiers to reduce humidity levels and prevent mold growth. Ventilation is crucial for preventing musty odors and promoting a healthy indoor environment.
Have a qualified professional inspect and, if necessary, repair your electrical systems. Water damage can compromise wiring and pose a serious risk of electrical fires.
Sanitize and Disinfect
Floodwater may contain contaminants, so it's essential to thoroughly sanitize and disinfect the affected areas. Use a mixture of bleach and water to clean surfaces, walls, and any salvageable items.
Dispose of irreparable items such as soaked drywall, insulation, and carpeting. These materials can harbor mold and compromise the structural integrity of your home.
Address Mold Promptly
Mold can start growing within 24 to 48 hours after flooding. Use mold-killing solutions on surfaces, and consider hiring professionals for extensive mold remediation to ensure a thorough and safe cleanup.
Take steps to prevent future basement flooding. Install a sump pump, consider exterior grading to direct water away from the foundation, and inspect and repair foundation cracks promptly.
When in doubt or facing extensive damage, consult with professionals experienced in water damage restoration. Their expertise and specialized equipment can accelerate the recovery process and minimize long-term consequences. Recovering from a flooded basement in the Northeast requires diligence, patience, and a systematic approach. By prioritizing safety, thoroughly cleaning and disinfecting, and implementing preventative measures, homeowners can not only recover from the immediate damage but also fortify their homes against future flooding challenges. Remember, professional assistance is always available to ensure a thorough and effective recovery process.
Unseen Consequences: Understanding the Impact of Smoke Damage on HVAC Systems
4/16/2024 (Permalink)
When a fire occurs, the impact is not confined to the visible damage alone. Smoke, a pervasive byproduct of fires, can infiltrate various parts of a property, including HVAC (Heating, Ventilation, and Air Conditioning) systems. In this blog, we'll delve into the often-overlooked consequences of smoke damage on HVAC systems and why addressing this issue is crucial for comprehensive fire damage restoration.
Smoke Residue in Ductwork
- Smoke particles are incredibly fine and can infiltrate the HVAC ductwork. Over time, this residue accumulates, affecting the overall air quality and potentially causing long-term issues if left unaddressed.
Circulation of Odor
Smoke carries strong odors that can permeate the HVAC system. Without proper cleaning, these odors may linger, affecting the comfort of the indoor environment even after visible fire damage has been addressed.
Damaged HVAC Components
- Smoke particles can settle on HVAC components, including fans, motors, and coils. This can lead to increased wear and tear, reduced efficiency, and potential malfunctions if the system is not thoroughly cleaned and restored.
Reduced Efficiency
- Smoke residue acts as an insulator, reducing the efficiency of the HVAC system. As the system struggles to maintain optimal performance, energy consumption may increase, leading to higher utility bills.
Potential Corrosion
Smoke contains acidic elements that, when settled on HVAC components, can contribute to corrosion over time. Corroded parts can compromise the structural integrity of the system, leading to premature failure.
Contaminated Air Filters
- Smoke particles can clog air filters, reducing airflow and causing the HVAC system to work harder. Regular replacement or thorough cleaning of filters is necessary to maintain optimal performance.
Residue in the Blower Motor
- The blower motor, a critical component of the HVAC system, can accumulate smoke residue. This accumulation can hinder the motor's functionality, leading to decreased airflow and increased strain on the system.
Extended Restoration Process
- Failure to address smoke damage in the HVAC system can prolong the overall restoration process. Thorough cleaning and, if necessary, replacement of HVAC components are essential to ensure a comprehensive restoration.
Persistent Odors
- Even after addressing visible damage, the presence of smoke particles in the HVAC system can contribute to persistent odors. Proper cleaning and restoration are crucial for eliminating these lingering smells.
Professional Inspection is Key
Identifying and addressing smoke damage in HVAC systems requires a professional inspection. Experienced technicians can assess the extent of the damage, determine the appropriate cleaning methods, and ensure the system is restored to optimal functionality.
Understanding the impact of smoke damage on HVAC systems is essential for a holistic fire damage restoration process. By addressing not only visible damage but also the often-hidden consequences in the HVAC system, property owners can ensure a thorough recovery and the long-term efficiency of their heating and cooling systems. Professional inspection and restoration are key components of mitigating the impact of smoke damage, ensuring a healthier, more efficient indoor environment.
Mold Testing Demystified: Timing and Techniques Done Right
3/7/2024 (Permalink)
Mold testing is a crucial step in maintaining a healthy home environment. Understanding when and how to perform mold testing is key to identifying and addressing potential issues. In this blog, we'll delve into the intricacies of mold testing.
When to Consider Mold Testing
If you notice visible mold growth in your home, especially in areas like walls, ceilings, or corners, it may be an opportune time for mold testing. Persistent musty odors can indicate hidden mold. If you've tried to eliminate odors through cleaning and ventilation without success, mold testing may be warranted.
Recent Water Damage
Following water damage events, such as leaks, floods, or burst pipes, it's advisable to conduct mold testing. Excess moisture from these incidents creates favorable conditions for mold growth. If occupants experience unexplained allergy-like symptoms, it might prompt consideration for mold testing.
Real Estate Transactions
Mold testing is often recommended during real estate transactions, especially if there is a history of water damage or if the property has been vacant for an extended period.
How to Perform Mold Testing
Begin with a thorough visual inspection of your home. Look for visible signs of mold growth, water damage, or areas with a musty odor. Visual cues guide where to focus your mold testing efforts.
DIY mold testing kits are available for home use. These kits typically involve collecting air or surface samples. Follow the kit instructions carefully, and send samples to a certified laboratory for analysis.
- Professional Mold Inspections
For a more comprehensive assessment, consider hiring a professional mold inspector. Professionals have the expertise to identify hidden mold and recommend appropriate testing methods.
Air sampling is a common method for mold testing. It involves collecting air samples to determine the concentration of mold spores. This method is useful for assessing overall air quality.
Surface sampling involves collecting samples from suspect surfaces, such as walls or furniture. It helps identify specific mold species and their concentration on surfaces.
Conduct moisture testing in areas prone to water damage. High moisture levels can contribute to mold growth, making moisture testing an integral part of mold testing.
After mold remediation efforts, conduct post-remediation testing to ensure that the mold has been effectively removed, and the affected area is restored to a healthy condition.
Mold testing serves as a proactive measure to identify and address potential mold issues in your home. Whether performed independently using DIY kits or by hiring professionals, the key lies in the timing of testing and the chosen methods. By integrating mold testing into your home maintenance routine, you contribute to creating a mold-resistant living space. If you are in need of mold remediation services, don’t hesitate and give our SERVPRO a call today!
Water Damage Prevention Beyond Restoration: Implementing Long-Term Strategies
2/20/2024 (Permalink)
Water damage can result in costly repairs and disrupt daily life. While restoration is crucial after a water incident, it is equally important to implement long-term strategies for water damage prevention. In this blog post, we will explore effective measures and strategies that can help safeguard your property against future water damage.
Regular Maintenance and Inspections
One of the key components of water damage prevention is regular maintenance and inspections. Conduct routine checks on your property's plumbing system, including pipes, faucets, and water fixtures. Look for signs of leaks, corrosion, or other damage that could potentially lead to water issues. Timely repairs or replacement of faulty components can prevent water damage before it ever occurs.
Ensure Proper Grading and Drainage
Proper grading and drainage around your property are essential in preventing water damage. Ensure that the ground slopes away from your foundation, directing water away from your home or building. This prevents water from pooling near the foundation, which can lead to leaks, basement flooding, or structural damage over time. Regularly clear gutters and downspouts to prevent blockages and ensure efficient water flow.
Install a Sump Pump
A sump pump can be a valuable investment in preventing water damage. It helps to remove excess water from basements or low-lying areas, reducing the risk of flooding. Whether powered by electricity or a backup battery, a sump pump provides added insurance against water intrusion during heavy rainfall or plumbing failures.
Utilize Water Detection and Alarm Systems
Water detection and alarm systems can provide early warning signs of water leaks or flooding. These systems utilize sensors that detect abnormal levels of moisture or water presence. When triggered, they will sound an alarm, allowing you to respond promptly and address potential water damage issues before they escalate.
Insulate Pipes and Install Leak Detection Devices
Insulating pipes helps prevent them from freezing and bursting during colder months, which can cause significant water damage. Additionally, installing leak detection devices can alert you to potential pipe leaks before they become major issues. These devices can automatically shut off the water supply when a leak is detected, minimizing potential damage.
Educate Occupants and Emergency Preparedness
Educating occupants on water damage prevention measures and emergency preparedness is crucial. Teach them how to locate and shut off the main water valve in case of emergencies. Promote awareness of water-saving practices, such as fixing dripping faucets and limiting water usage during heavy rainfall to prevent overloading drainage systems.
Water damage prevention goes beyond restoration; implementing long-term strategies is essential for safeguarding your property. By regularly maintaining and inspecting your property, implementing proper grading, utilizing technology and educating occupants, you can minimize the risk of water damage, providing peace of mind for years to come.
Rooted Resilience: Storm-Proofing Your Landscaping with Trees, Shrubs, and Garden Tips
1/17/2024 (Permalink)
As storms brew on the horizon, your landscaping stands as the first line of defense against nature's wrath. Strengthening your outdoor haven requires more than aesthetics; it demands a strategic approach to storm-proofing. In this blog, we'll explore tips and techniques to fortify your landscaping, focusing on trees, shrubs, and gardens to ensure they stand tall and resilient in the face of tempestuous weather.
Choose Wind-Resistant Trees
When selecting trees for your landscape, opt for species known for their wind resistance. Trees such as oak, magnolia, and certain types of pine are known for their robust structures, better withstanding the forces of strong winds.
Regular pruning is not just about aesthetics; it's a crucial aspect of storm-proofing. Trim branches to enhance structural integrity and promote better airflow through the tree canopy. This reduces the risk of wind damage and improves overall tree health.
Mulch for Stability
Mulch is a landscaping superhero. Not only does it retain soil moisture and suppress weeds, but it also stabilizes the soil around trees and shrubs. Apply a thick layer of mulch, leaving a gap around the tree trunk, to prevent soil erosion and enhance stability.
Reinforce Tree Roots
Strong roots are the foundation of a resilient tree. Mulch, when applied properly, helps insulate the soil and aids in root development. Additionally, consider installing root barriers to guide the growth of roots away from structures and pathways.
Well-draining soil is essential for preventing water logging during storms. Ensure proper soil drainage around trees and shrubs by amending the soil with organic matter and creating gentle slopes away from the plants.
Invest in Windbreaks
Windbreaks, such as strategically planted rows of shrubs or trees, can significantly reduce wind speed and protect your landscape from the full force of storms. Plant windbreaks on the windward side of your property for maximum effectiveness.
Trellises, arbors, and other garden structures can become projectiles in strong winds. Reinforce them with sturdy materials and secure them firmly to the ground. Consider removing lightweight structures before an impending storm.
Choose Storm-Resistant Plants
When planning your garden, opt for storm-resistant plants. Native species are often well-adapted to local weather conditions. Research and select plants known for their ability to withstand high winds and heavy rain.
Storms can lead to soil erosion, especially on sloped landscapes. Implement erosion control measures such as retaining walls, terracing, or ground covers to stabilize the soil and prevent runoff.
Trim Overhanging Branches
Overhanging branches can pose a risk during storms, especially if they are close to structures. Trim branches that may pose a threat to your home or other valuable assets to reduce the risk of damage.
Stay Informed and Plan Ahead
Monitor weather forecasts and stay informed about potential storms. Plan ahead by securing loose items, preparing your landscape for heavy rain, and taking any necessary precautions well in advance.
Storm-proofing your landscaping is a blend of strategic planning, regular maintenance, and informed choices. By selecting wind-resistant plants, reinforcing structures, and promoting a healthy soil environment, you create a landscape that not only weathers the storm but emerges stronger and more resilient. Rooted in these tips, your outdoor haven becomes a testament to nature's beauty and the human ability to coexist harmoniously with the elements.
The Power of Thermal Imaging in Fire Damage Restoration: Benefits You Need to Know
11/16/2023 (Permalink)
Fire damage restoration is a complex process that involves identifying affected areas, assessing the damage caused, and developing a plan to restore the property. One of the most effective tools that fire damage restoration experts use is thermal imaging. Thermal imaging provides a non-invasive way to detect hidden fire damage and water damage, making the restoration process smoother and more efficient. In this blog, we will explore the benefits of using thermal imaging in fire damage restoration.
Detect Hidden Damage
Thermal imaging helps identify damage that may be invisible to the naked eye. It detects variations in temperature, revealing spots where fire damage and water damage have occurred. This is particularly useful in detecting hidden pockets of moisture that may contribute to mold growth. Thermal imaging allows restoration professionals to identify fire damage and water damage areas quickly and accurately. This speeds up the restoration process, minimizing disruption to occupants' lives.
Cost Savings
Early detection of fire damage and water damage through thermal imaging can prevent or minimize the need for expensive repairs. This can also reduce the overall cost of the restoration project.
More Accurate Assessments
Thermal imaging provides detailed information on the extent of the fire and water damage. This enables restoration professionals to develop more accurate assessments of the work needed and develop more effective remediation solutions.
Increased Safety
Thermal imaging enables restoration professionals to identify potential safety hazards, such as overheated wires, before they cause a fire or electrical shock.
Improved Communication
Restoration professionals can use thermal imaging to explain the extent of the damage to insurance adjusters, property owners, and occupants. This visual tool helps all parties involved understand the restoration process better.
Reduced Liability
By using thermal imaging as part of the restoration process, restoration professionals can demonstrate that they used best practices when restoring the property. This may reduce their liability in the event of further damage or claims.
In conclusion, thermal imaging is a powerful tool in the fire damage restoration process. It provides quick and accurate detection of hidden damage, speeds up the restoration process, and reduces overall costs. Thermal imaging also enhances communication, helps improve safety, and reduces liability for restoration professionals. It is a valuable tool that every fire damage restoration professional should have in their toolkit. If you're dealing with fire damage, contact a professional damage restoration company that uses thermal imaging for a more effective and efficient restoration process.
Tips to Prevent Mold in Vacation Rentals
10/24/2023 (Permalink)
Welcoming guests to your vacation rental is a rewarding experience, but it comes with responsibilities, including maintaining a clean and safe environment. Mold can be an unexpected issue, potentially affecting your guests' comfort and overall satisfaction. In this blog, your local SERVPRO® team will share essential tips to ensure guest safety and prevent mold in your Topsham vacation rentals.
Understanding the Importance of Mold Prevention
Mold is a common issue in properties with varying levels of occupancy, and it can thrive in the unique coastal climate of Topsham, ME. While mold itself may not always pose immediate concerns, it can create an unpleasant environment, leading to guest discomfort and potentially damaging your property's reputation.
Mold Prevention for Vacation Rentals
Regular Inspections
Implement a routine inspection schedule to identify and address potential moisture issues promptly. Check for signs of water leaks, condensation, or dampness in bathrooms, kitchens, and other susceptible areas.
Proper Ventilation
Ensure your vacation rental is adequately ventilated to prevent moisture buildup. Use exhaust fans in bathrooms and kitchens to expel moist air outdoors. Open windows when possible to promote fresh air circulation.
Regular Cleaning and Maintenance
Conduct thorough cleaning and maintenance between guest stays. Pay attention to cleaning high-humidity areas like bathrooms and kitchens to prevent mold-friendly conditions.
Address Water Leaks
Swiftly repair any water leaks or plumbing issues. Mold often thrives in areas with unresolved moisture problems. Inspect your property's roof, windows, and doors for potential entry points for water intrusion.
Control Humidity
Use dehumidifiers in areas prone to high humidity, such as basements or enclosed spaces, to maintain humidity levels below 50%. Keep an eye on your property's HVAC system to ensure it functions correctly and aids in humidity control.
Educate Your Cleaning Team
Train your cleaning staff to recognize signs of mold or moisture issues and to report them immediately. Ensure they use appropriate cleaning products and techniques to prevent mold growth.
Guest safety and satisfaction are paramount when managing vacation rentals in Topsham, ME. By implementing these mold prevention measures and maintaining a clean, dry environment, you can create an enjoyable and comfortable experience for your guests. Remember that prevention is the key to ensuring that mold issues do not affect your property's reputation or guest experiences. If you ever encounter mold problems beyond your control, our local SERVPRO® of Bath/Brunswick team is here to assist you with professional mold remediation services. Stay proactive and keep your vacation rental mold-free for happy and satisfied guests!
Water-Damaged Drywall: Addressing Structural Damage
10/18/2023 (Permalink)
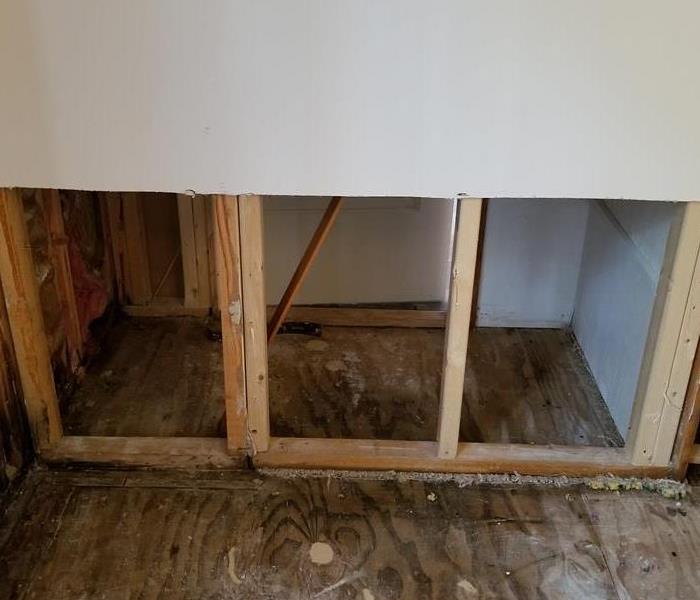 When water damage leaves behind drywall damage, we use flood cuts to dry and restore your property properly.
Water damage is a common problem in homes, and one of the areas that often suffer the most is drywall. When drywall gets wet, it can quickly become weakened, damaged, and pose structural risks. In this blog post, we will discuss the steps you can take to address water-damaged drywall and prevent further structural issues in your home.
Assess the Damage
Safety first! Before assessing the damage, ensure the space is safe to enter. Turn off power in affected areas and wear appropriate protective gear such as gloves, goggles, and a mask.
Determine the extent of the damage by checking for signs of swelling, discoloration, sagging, or crumbling of drywall. These indicate that the drywall has absorbed water and may be structurally compromised. Using a utility knife, carefully cut along the damaged areas, creating a clean edge. Remove the wet drywall sections, making sure to dispose of them properly. Check for signs of insulation damage or mold growth. If found, address these issues as well.
Dry Out the Area
Remove moisture by using fans, dehumidifiers, and open windows to promote air circulation and expedite drying. It is important to thoroughly dry the affected area before proceeding with repairs to prevent mold growth and further damage. Treat the areas affected by mold or mildew. Look for signs of mold or mildew on adjacent surfaces and materials. If mold is present, clean the area with a mixture of water and mild detergent. Then, use a mold treatment solution following the manufacturer's instructions to prevent regrowth.
Repair and Restore
Reinforce the structure. If the drywall behind the removed section is weakened, consider reinforcing it with additional support, such as braces or studs. Cut and install new drywall pieces to fit the area. Make sure to secure them properly, ensuring a smooth and even surface. Apply drywall joint compound and tape to seamlessly blend the new drywall with the existing walls. Sand and prime the repaired area before painting.
Address the Underlying Cause
Identify the source. Determine the cause of the water damage, whether it's a leaking pipe, roof issue, or compromised foundation. Fixing the source is essential to preventing further water damage and structural issues in the future. Seek professional assistance. If the water damage is extensive, the structure is severely compromised, or you are unsure about the repairs, it is wise to consult a professional water damage restoration or construction company.
If the damage is significant, document the repairs and consult with your insurance provider to assess whether your policy covers the necessary repairs.
Water-damaged drywall can lead to serious structural issues if not properly addressed. By promptly assessing the damage, removing wet drywall, drying the area, treating for mold, repairing and restoring, addressing the underlying cause, and seeking professional assistance when necessary, you can effectively manage water damage and maintain the structural integrity of your home. Remember, swift action is key to minimizing long-term complications and creating a safe and secure living environment for you and your family.
The Role of SERVPRO in Storm Damage Restoration
9/11/2023 (Permalink)
 With SERVPRO by your side, you can trust that your home or property is in capable hands.
Northeast storms can wreak havoc on homes and properties, leaving behind a trail of destruction and damage. As a home or property owner, dealing with the aftermath of a severe storm can be overwhelming and challenging. However, there's no need to face it alone. In this blog, we will explore the vital role of SERVPRO of Bath/Brunswick in storm damage restoration, highlighting how this professional restoration company can be your trusted partner in times of crisis.
Rapid Response and 24/7 Availability
When disaster strikes, time is of the essence. SERVPRO understands the urgency of storm damage restoration and provides a rapid response team available 24/7. Regardless of the time of day or night, their experts are ready to mobilize and assess the damage to your property promptly. This immediate response helps prevent further damage and accelerates the restoration process.
Comprehensive Damage Assessment
Upon arrival, SERVPRO's experienced technicians conduct a thorough damage assessment of your property. They identify areas affected by water, wind, or other storm-related issues. By conducting a comprehensive assessment, SERVPRO ensures no damage goes unnoticed, allowing for a tailored restoration plan to be put into action.
Expert Water Extraction and Drying
Flooding from storms can quickly saturate your property, causing water damage to floors, walls, and belongings. SERVPRO utilizes advanced equipment for efficient water extraction and drying. Their powerful pumps and industrial-grade dehumidifiers remove standing water and moisture, mitigating the risk of mold growth and structural damage.
Professional Mold Remediation
With water damage comes the risk of mold growth, which can lead to serious issues and further property damage. SERVPRO's mold remediation experts are trained to identify and safely remove mold from affected areas. They also take measures to prevent future mold growth, ensuring a healthy and safe living environment.
Structural Restoration and Repair
Storms can cause structural damage to roofs, walls, windows, and more. SERVPRO's skilled team is equipped to handle all aspects of structural restoration and repair. From roof tarping and board-up services to rebuilding damaged areas, they ensure your property is restored to its pre-storm condition.
Content Cleaning and Restoration
Storms can leave your personal belongings and valuable items damaged. SERVPRO's content cleaning and restoration services aim to salvage as much as possible. With specialized cleaning techniques and equipment, they restore your belongings, saving you the cost of replacements.
Seamless Insurance Coordination
Navigating insurance claims can be overwhelming. SERVPRO's experts are well-versed in working with insurance companies and can assist you throughout the claims process. Their detailed documentation and communication with insurance adjusters ensure a smoother and faster claim resolution.
When faced with the daunting task of Northeast storm damage restoration, SERVPRO of Bath/Brunswick stands as a reliable and experienced partner. Their rapid response, comprehensive assessment, and expert restoration services ensure your property is restored efficiently and effectively. With SERVPRO by your side, you can trust that your home or property is in capable hands, allowing you to focus on moving forward after a storm's devastation. Don't hesitate to seek their professional assistance to mitigate storm damage and restore your property to its pre-storm condition.
How to File a Claim After a Fire: A Step-by-Step Guide for Homeowners
8/20/2023 (Permalink)
A fire at your home can be a devastating experience. Besides the physical damage to your property and belongings, there are emotional and financial stresses that come with the aftermath. That's why having insurance to cover the damage caused by a fire is important. Once you've ensured the safety of everyone involved, the next step is filing an insurance claim. In this blog post, we'll outline the steps to guide you in filing a claim after a fire.
Contact Your Insurance Company
The first step to take after a fire is to contact your insurance company immediately. Your insurance provider can help you determine your coverage and guide you through the claims process. Insurance companies usually have a 24/7 emergency contact number, so you can make the call even outside regular business hours. Provide as much information about the fire as possible, including the date, time, location, and cause if known.
Secure your belongings
It's essential to protect your property from further damage after a fire. Secure the property by boarding up any broken windows, doors, and holes. Cover up any roof damage and tarp over the area to prevent further water damage if the fire department has used water to put out the fire. Protect the interior by keeping the power off until properly inspected by a qualified electrician.
Create an inventory of all damaged or lost belongings as early on as possible. Take photos or videos of the damage if it is safe to do so. You can start to remove any undamaged contents and clothing to use in your list of personal property items that have been affected by the fire. This inventory will be useful when working with your insurance company and help determine the amount of coverage you may receive.
Document the Damage and expenses
Once it is safe to re-enter the property, document all the damages in detail. List down all the items, including any damage to walls, ceilings, and floors. Take multiple photos of the damage, and make sure each item is documented. Make a detailed list of what has been lost and damaged and any other costs you may incur from the fire. This information will be critical to making an accurate claim.
Track all the expenses you incur during the fire recovery process. Keep detailed receipts, invoices, and other pertinent documents to show the costs of temporary lodging, transportation, storage, and living expenses. Keep all your receipts relating to any additional expenses you are incurring as a result of the fire, such as meals, accommodation, transport, etc.
Work with Insurance Adjuster
After assessing the damage and reviewing the inventory, your insurance company will send an insurance adjuster to your home. The adjuster will evaluate the extent of damage and determine the amount of coverage that your policy provides. Work closely with the adjuster during the inspection to ensure that all damage is adequately recorded. Be sure to ask questions and clarify any concerns you have.
After assessing the damage and calculating the cost, the insurance company will prepare a settlement offer for review. They will provide you with a full and final settlement amount subject to your deductible and limitations and exclusions under your policy. Acceptance or rejection of the offer in writing will indicate clear and final acceptance or rejection of the offer. If you disagree with the final settlement, you may dispute or negotiate with your insurance company.
Once you have the insurance payout, it's time to begin to repair and rebuild your home. Work with a reliable contractor, and be sure to keep all documents and receipts of the work done. Keep track of the payments made to contractors and ensure that the work is up to standard.
In conclusion, filing a claim after a fire can be a complex process, but it doesn't have to be overwhelming. By following a step-by-step guide and working with your insurance company, you can protect your legal rights, secure the compensation you deserve, and begin the recovery process. Always be honest and open about your claim, and ensure that you have proof and documentation to support your claim. With perseverance and determination, you can rebuild your property and move forward with your life.


 24/7 Emergency Service